Hey Porkchop!

Hey Porkchop!

  • 2021 Blog
  • 2018 Blog
  • Home
  • About
  • Contact
kaethes-1-2.jpg
kaethes-1.jpg

Käthes Schwester

January 24, 2018 by Amanda Jennings in Clothing, Creating, Year of Creating

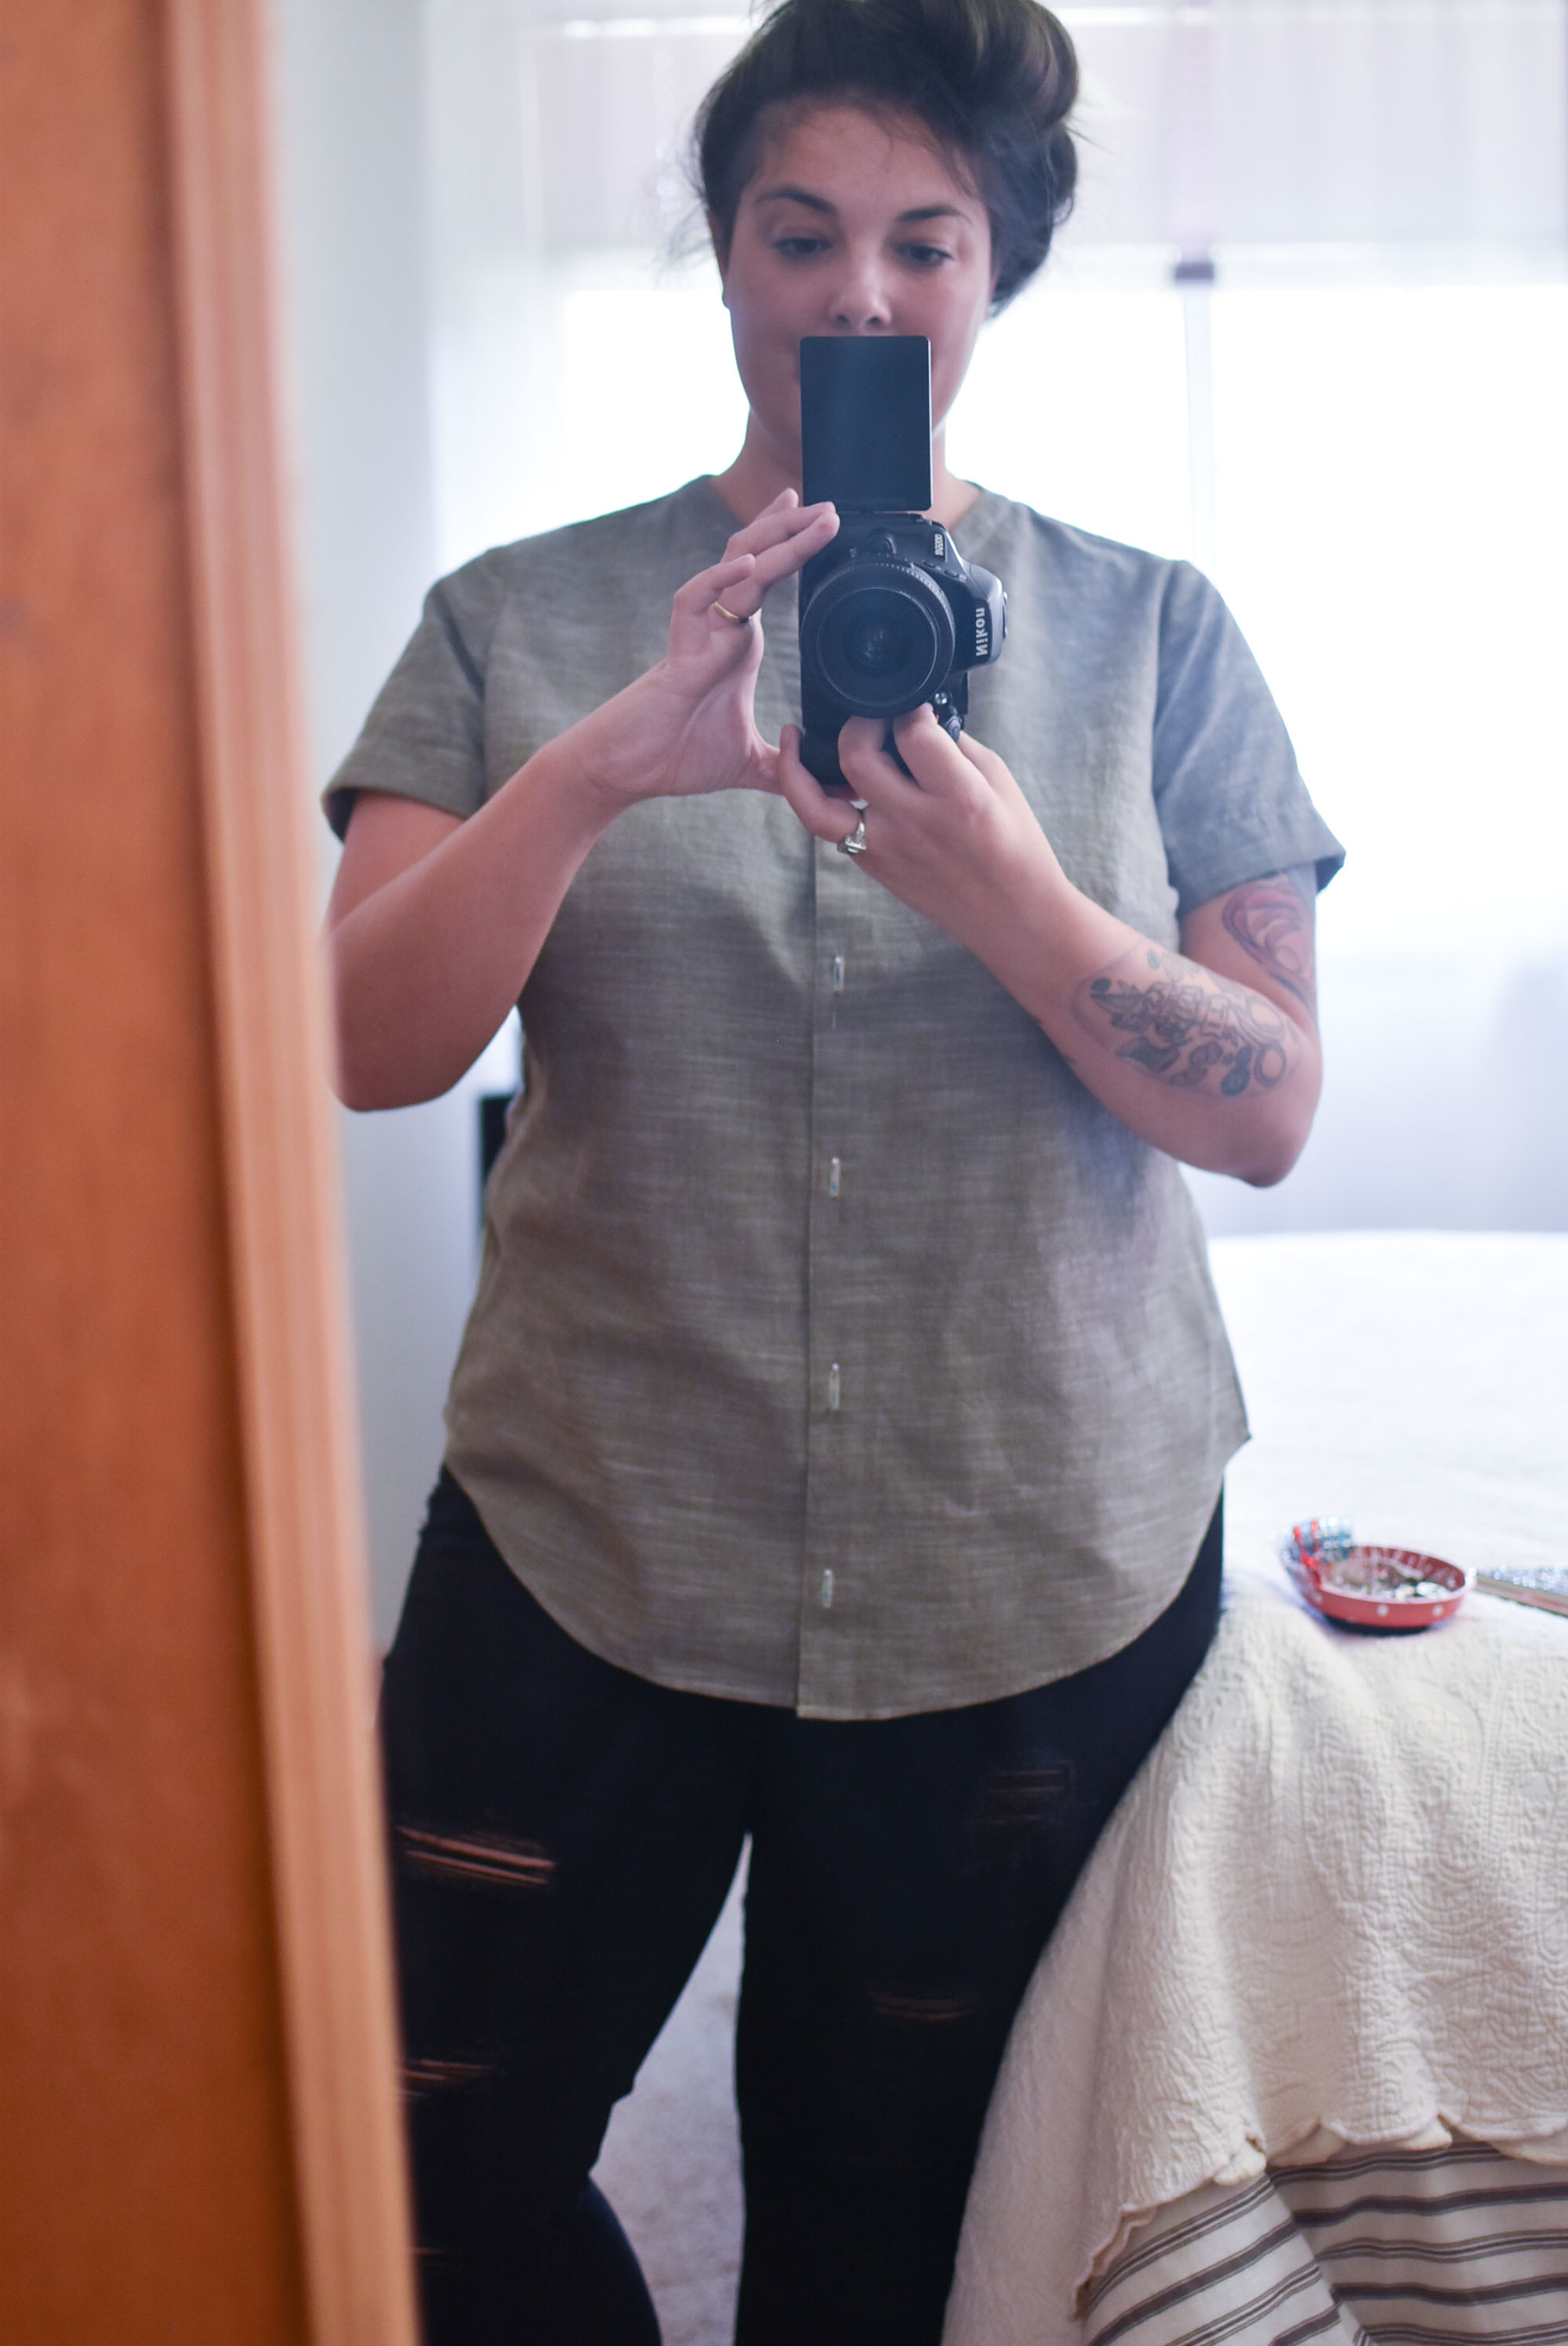
One of my goals this month was to try Kathe's Sister Hoodie by Konfetti Patterns!

I'm pleased to say that not only did I achieve this goal but I've been wearing it nonstop! Each time I love it a bit more!

A few quick notes:

  • The pattern is in German but if you've sewn a knit before, there is no reason why you can't do this! It has photos and it's a very detailed pattern. Also, Google Translate is your friend!
  • Makerist is the easiest to shop with if you use Google Chrome, as it translates the page automatically.
  • The pattern is meant to be printed on A4 paper. You can purchase it on Amazon *affiliate link* and it's easy to use. I adjusted the paper tray on my printer to A4, then when printing, selected A4 size. Easy peasy.
  • You have to add seam allowances. This isn't hard and I learned on Facebook that you can measure a highlighter and if the pen measures 1/4 inch, you can just use it and go around the pattern! Super fast!
  • Speaking of Facebook, there is a wonderful group called International Knit Sew-a-Longs. Everyone is very supportive and it's fun!
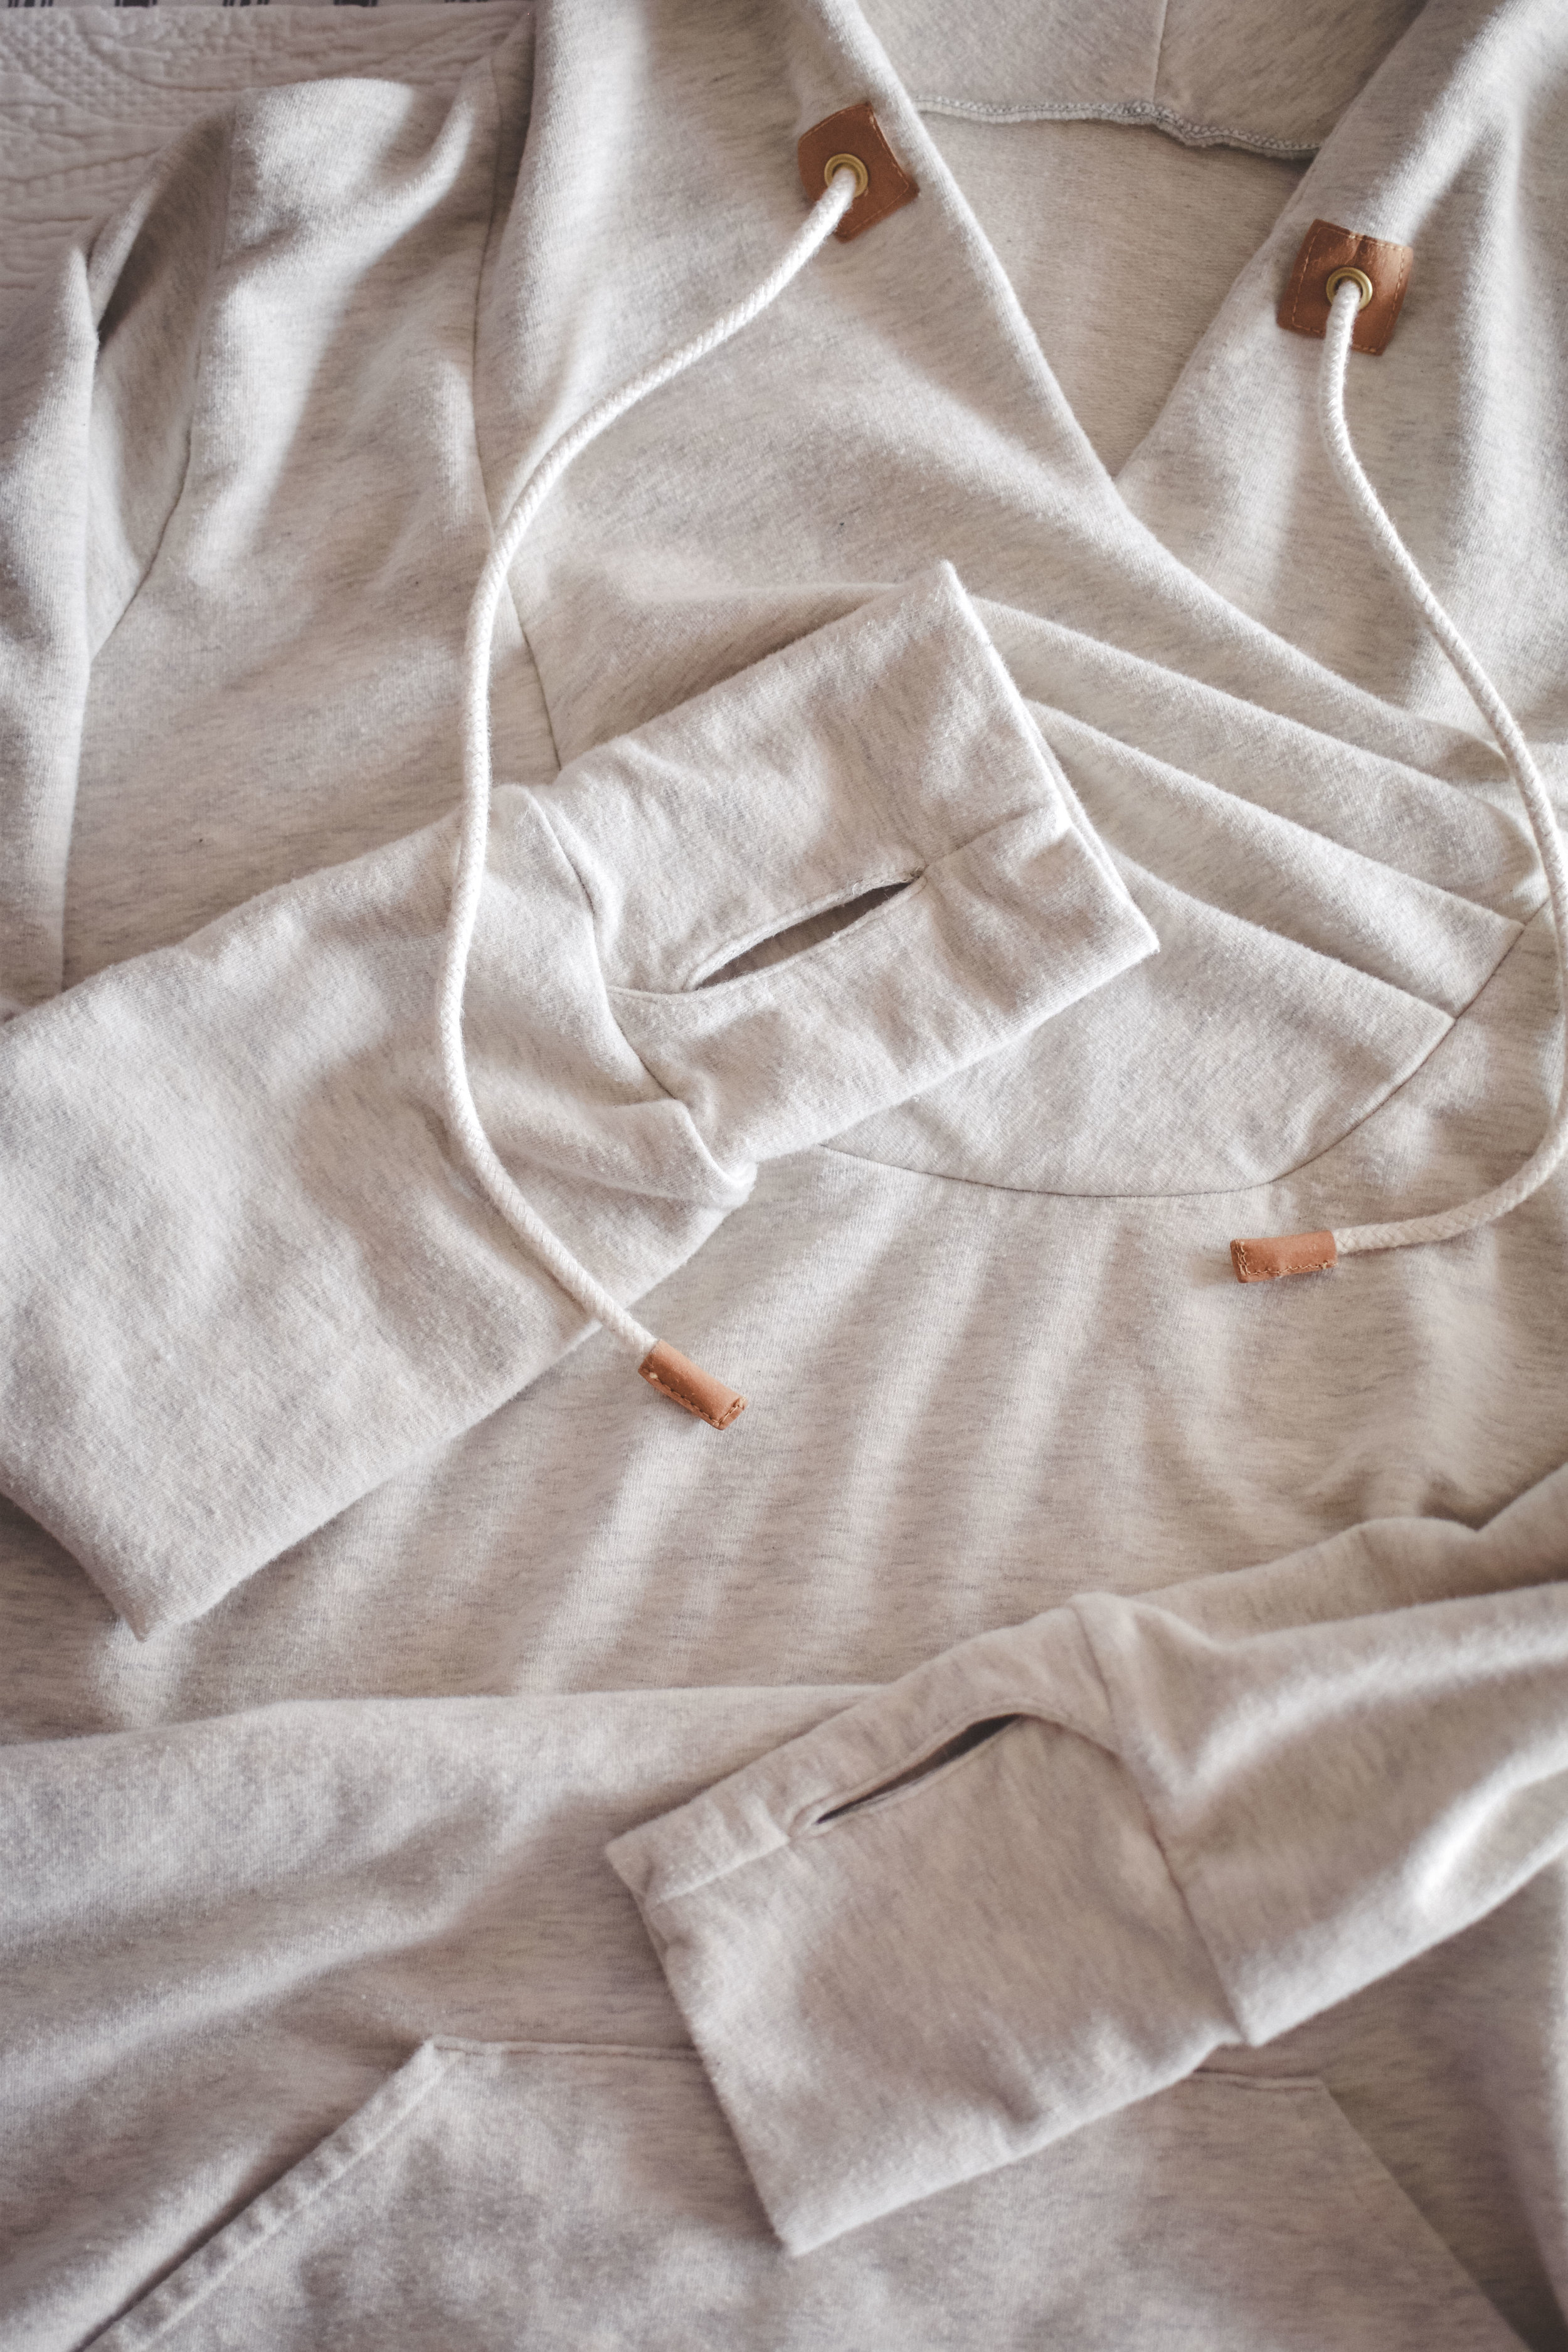
  • Kraft-Tex *affiliate link* is a really neat thing to get and I think it elevates the look of your hoodie. A lot of the patterns on Makerist have cute little details that this stuff comes in really handy for! 
hoodie-1-2.jpg
IMG_0480.JPG

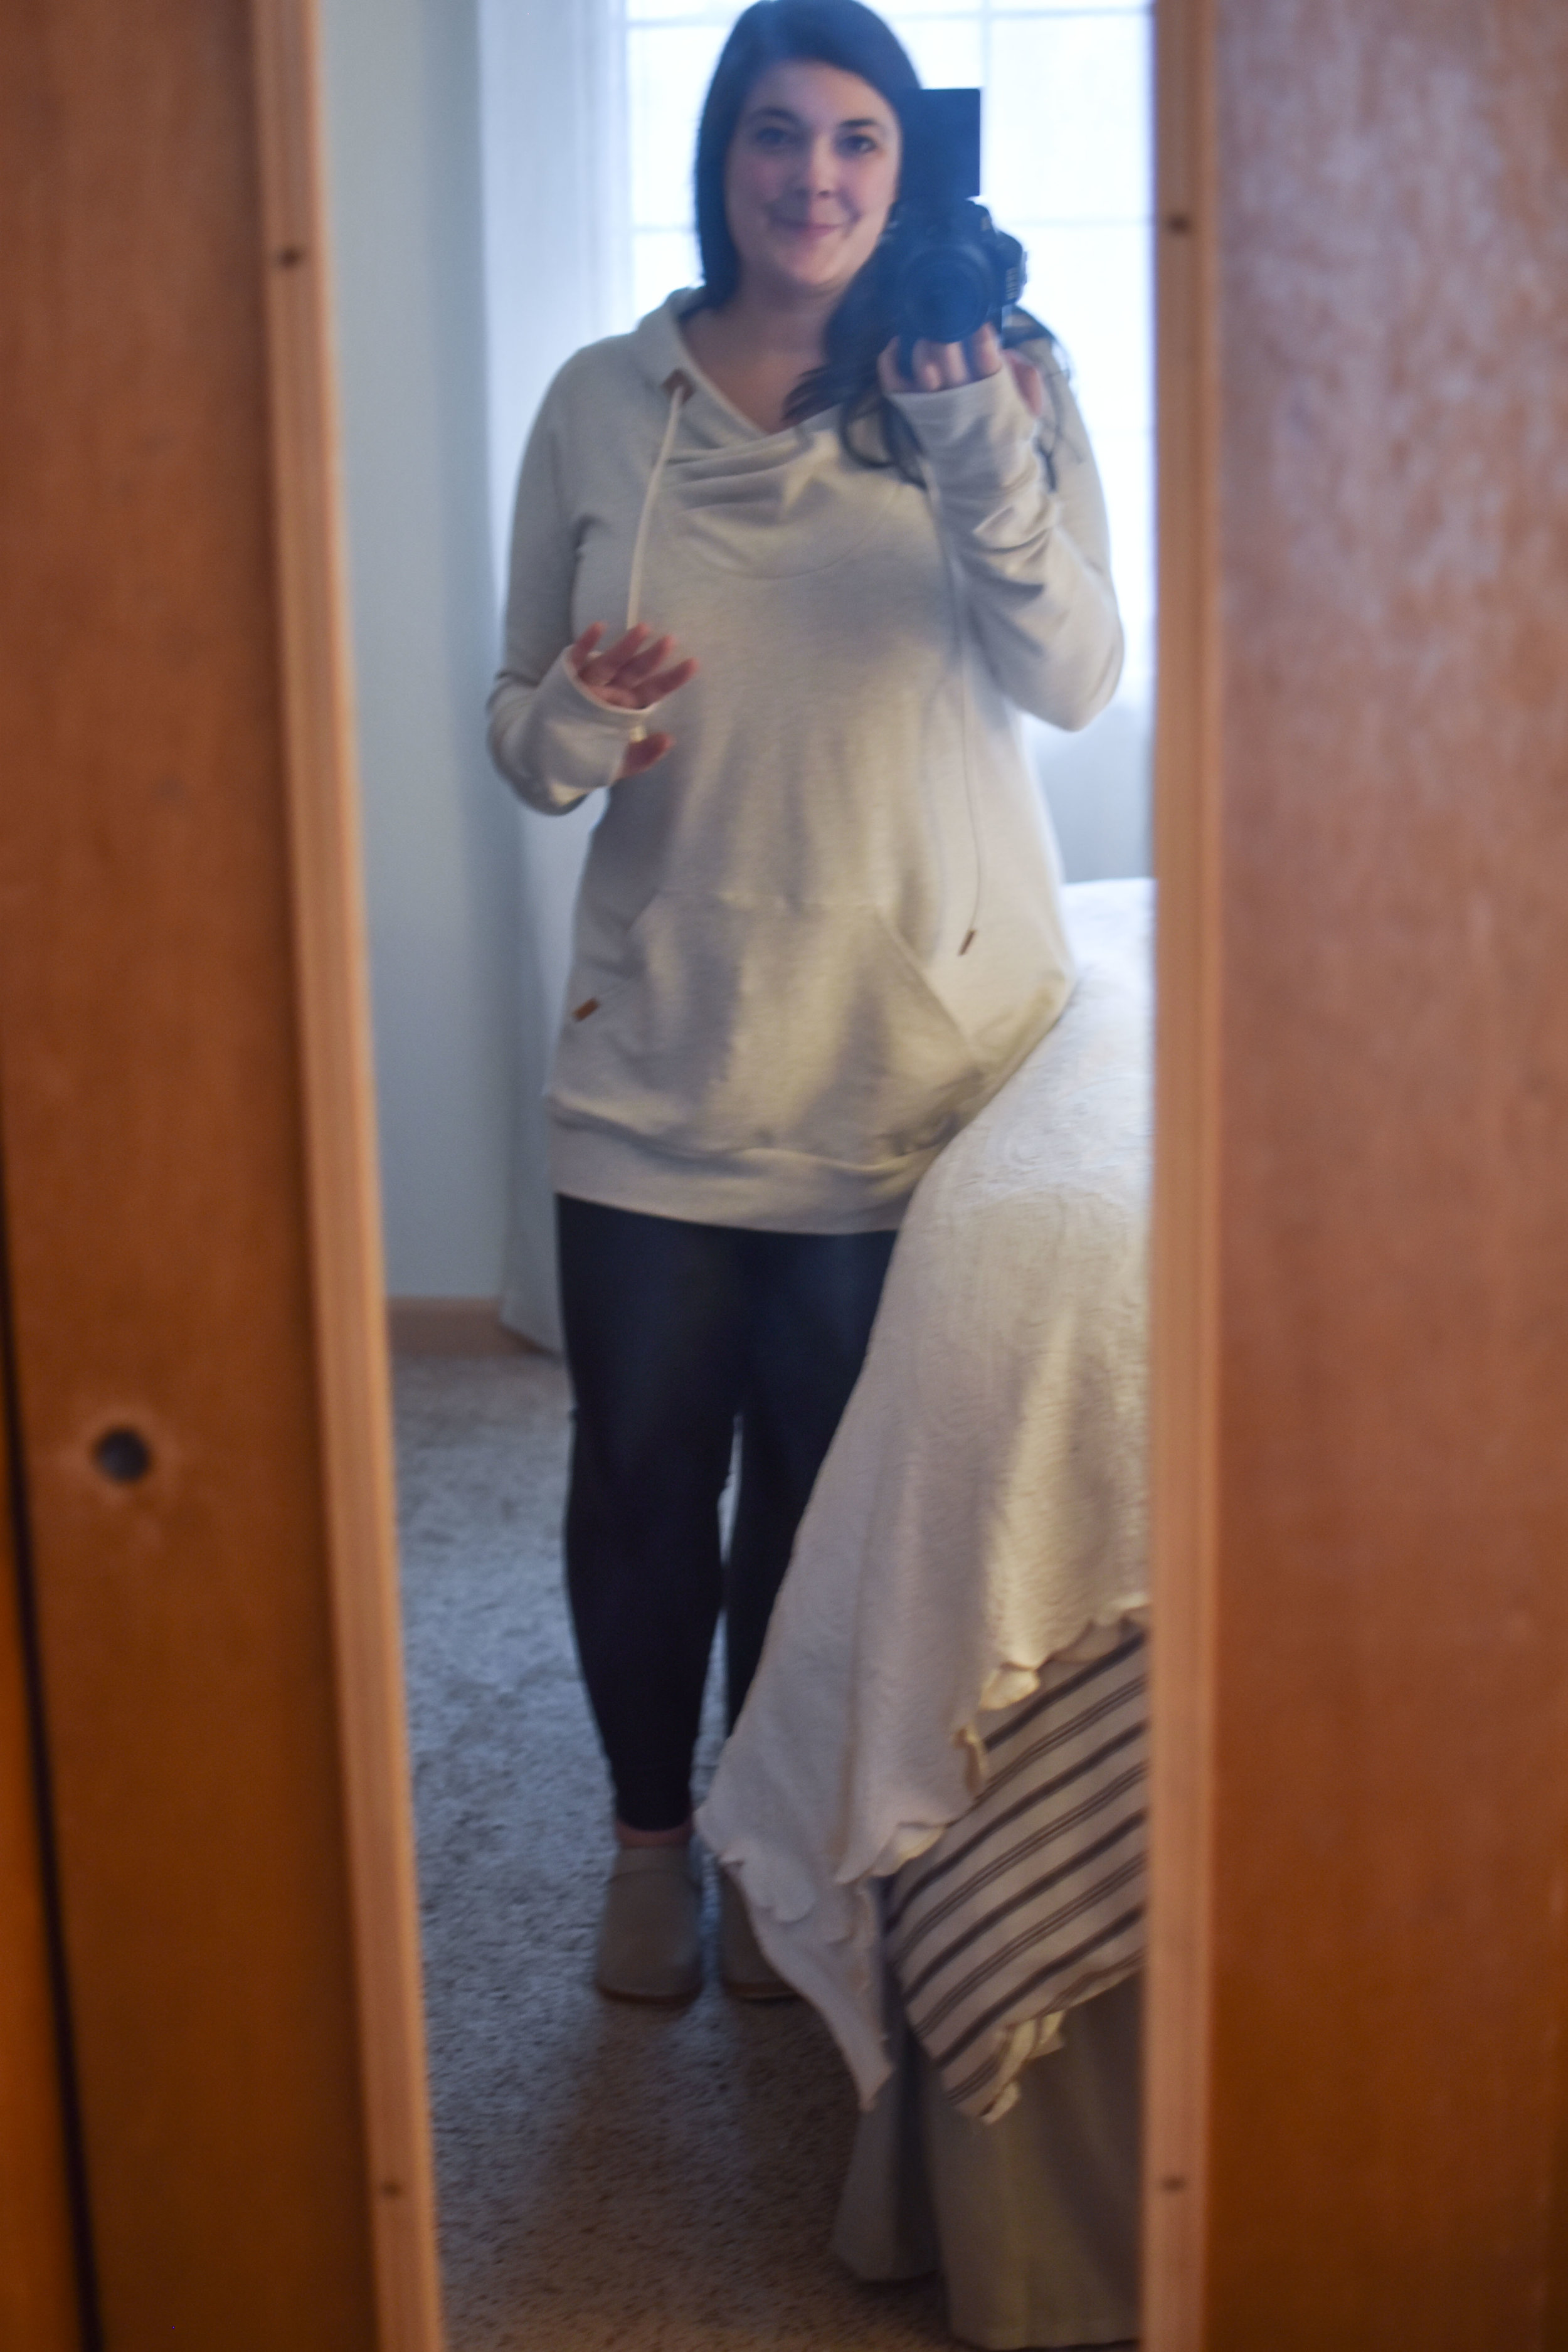
I'm hoping in 2018 I'll get a little more confident/better at taking photos of myself in clothes but...that might not happen! *laughs* 

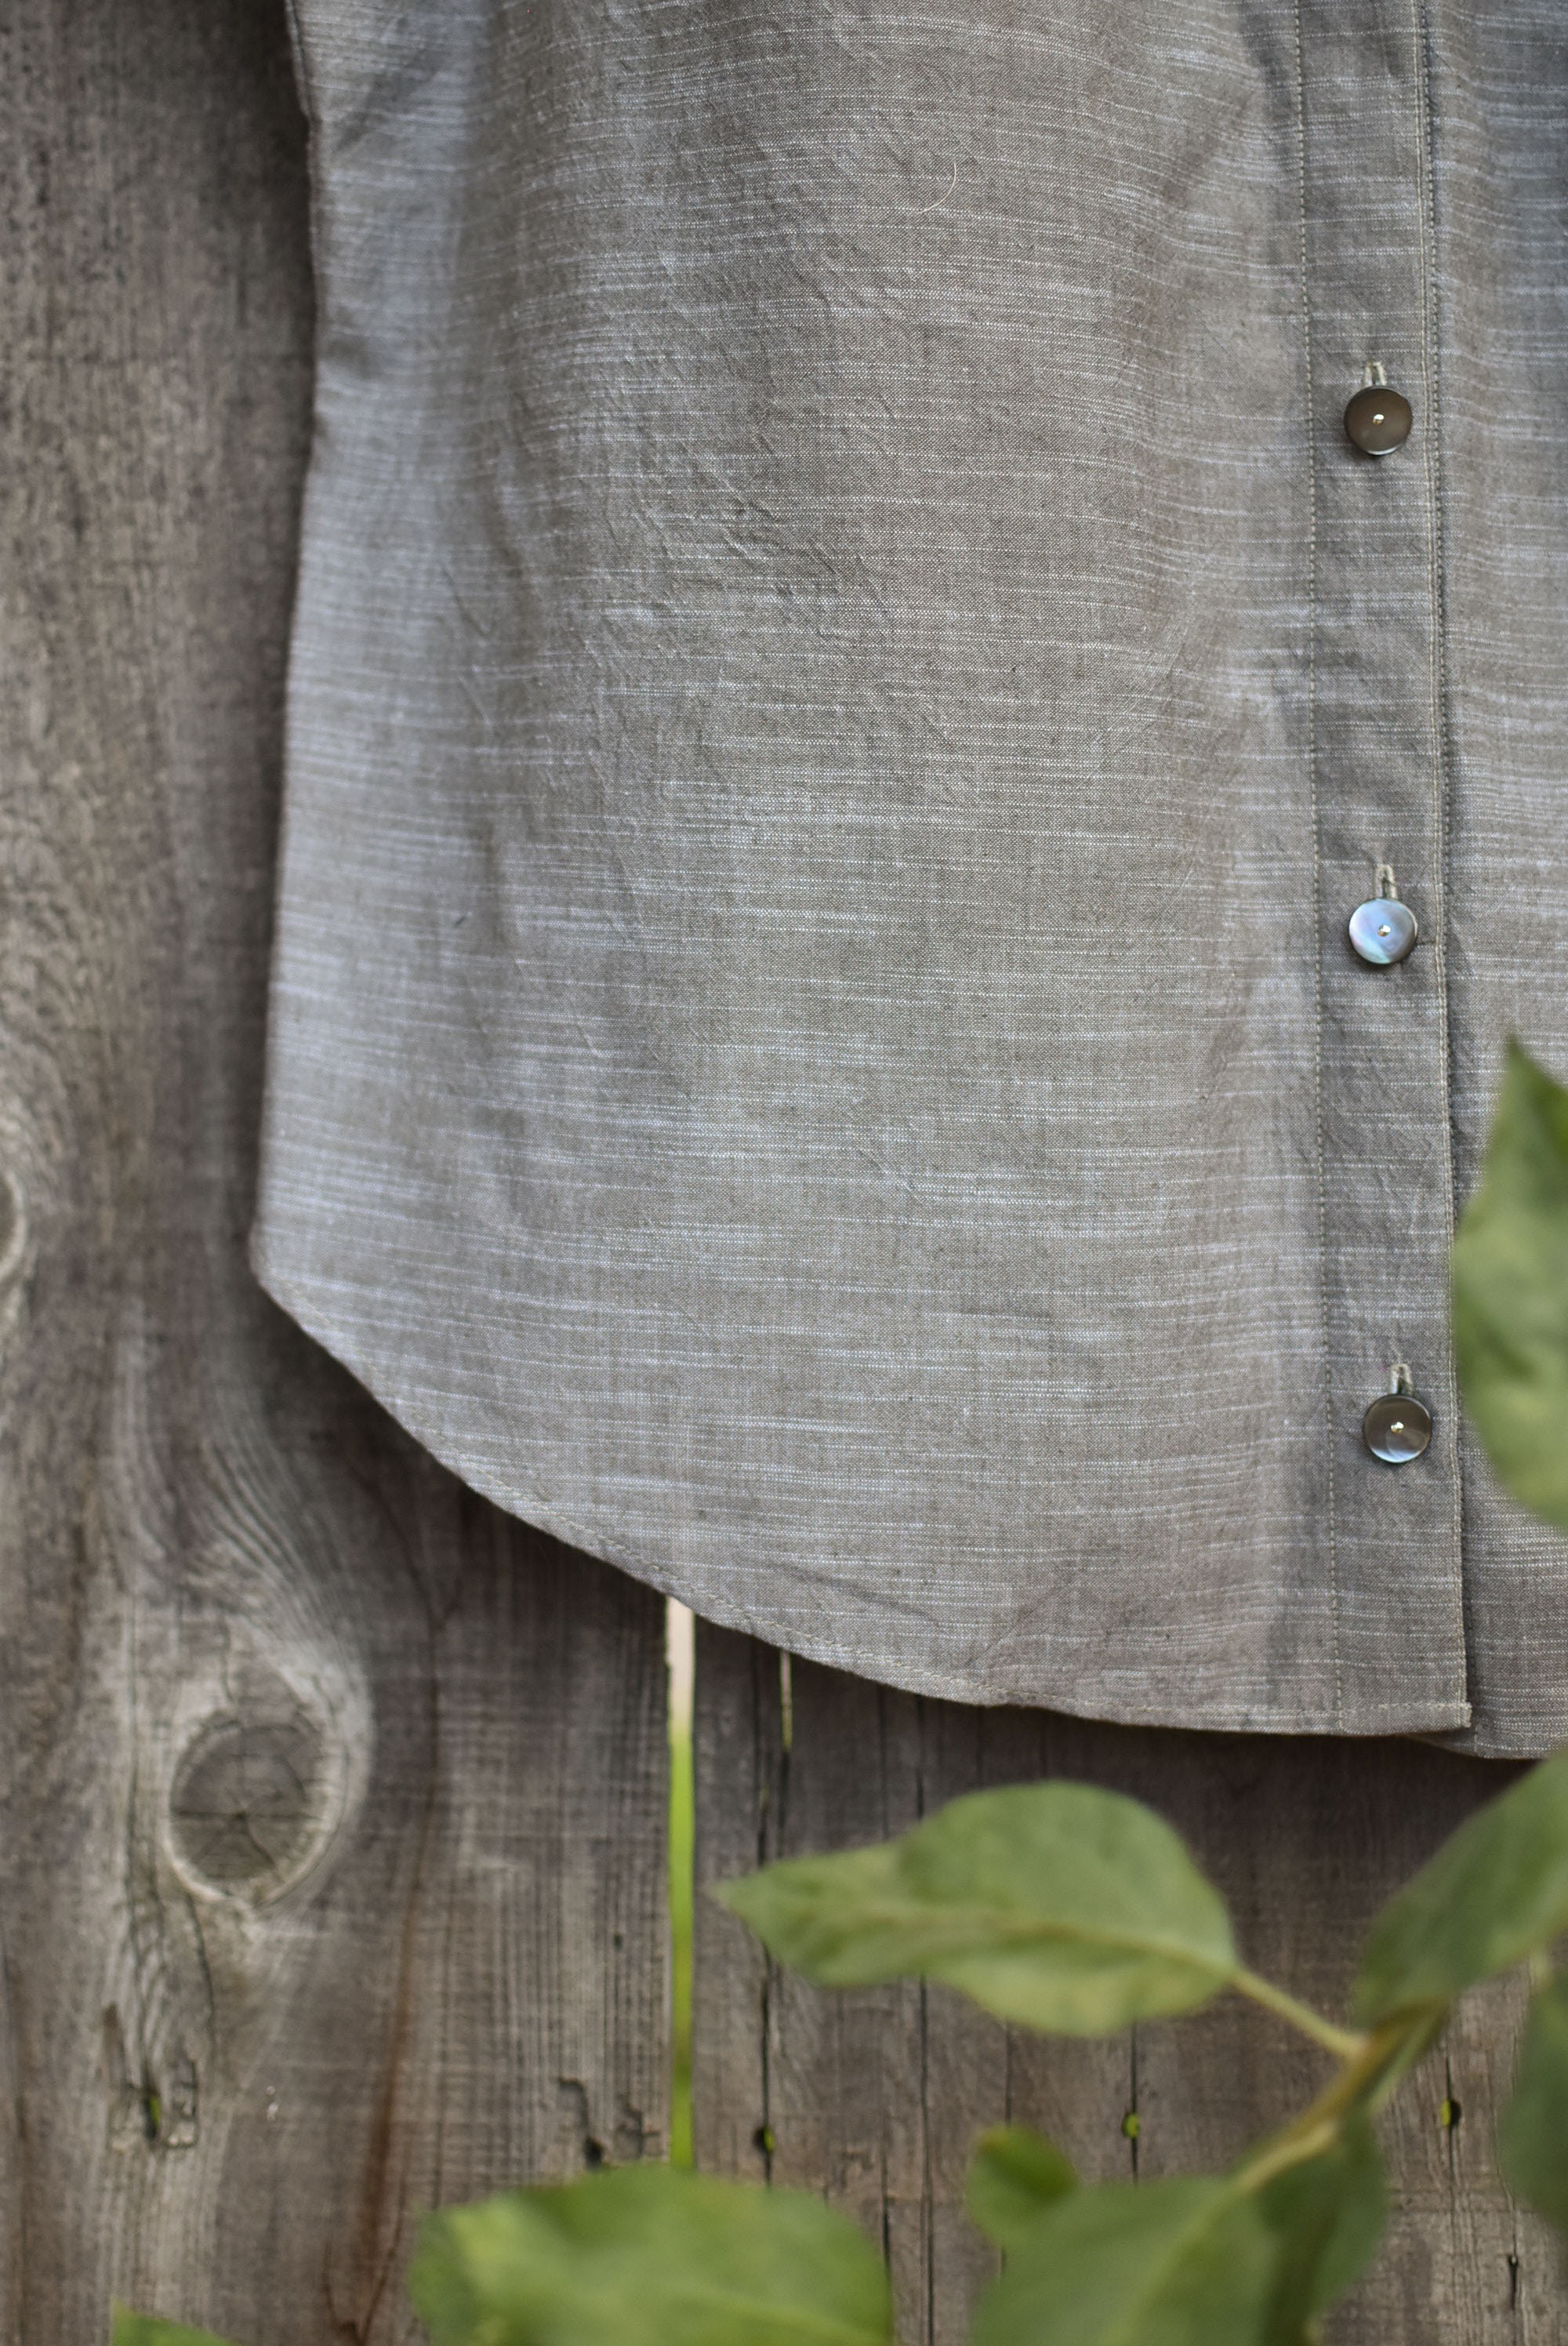
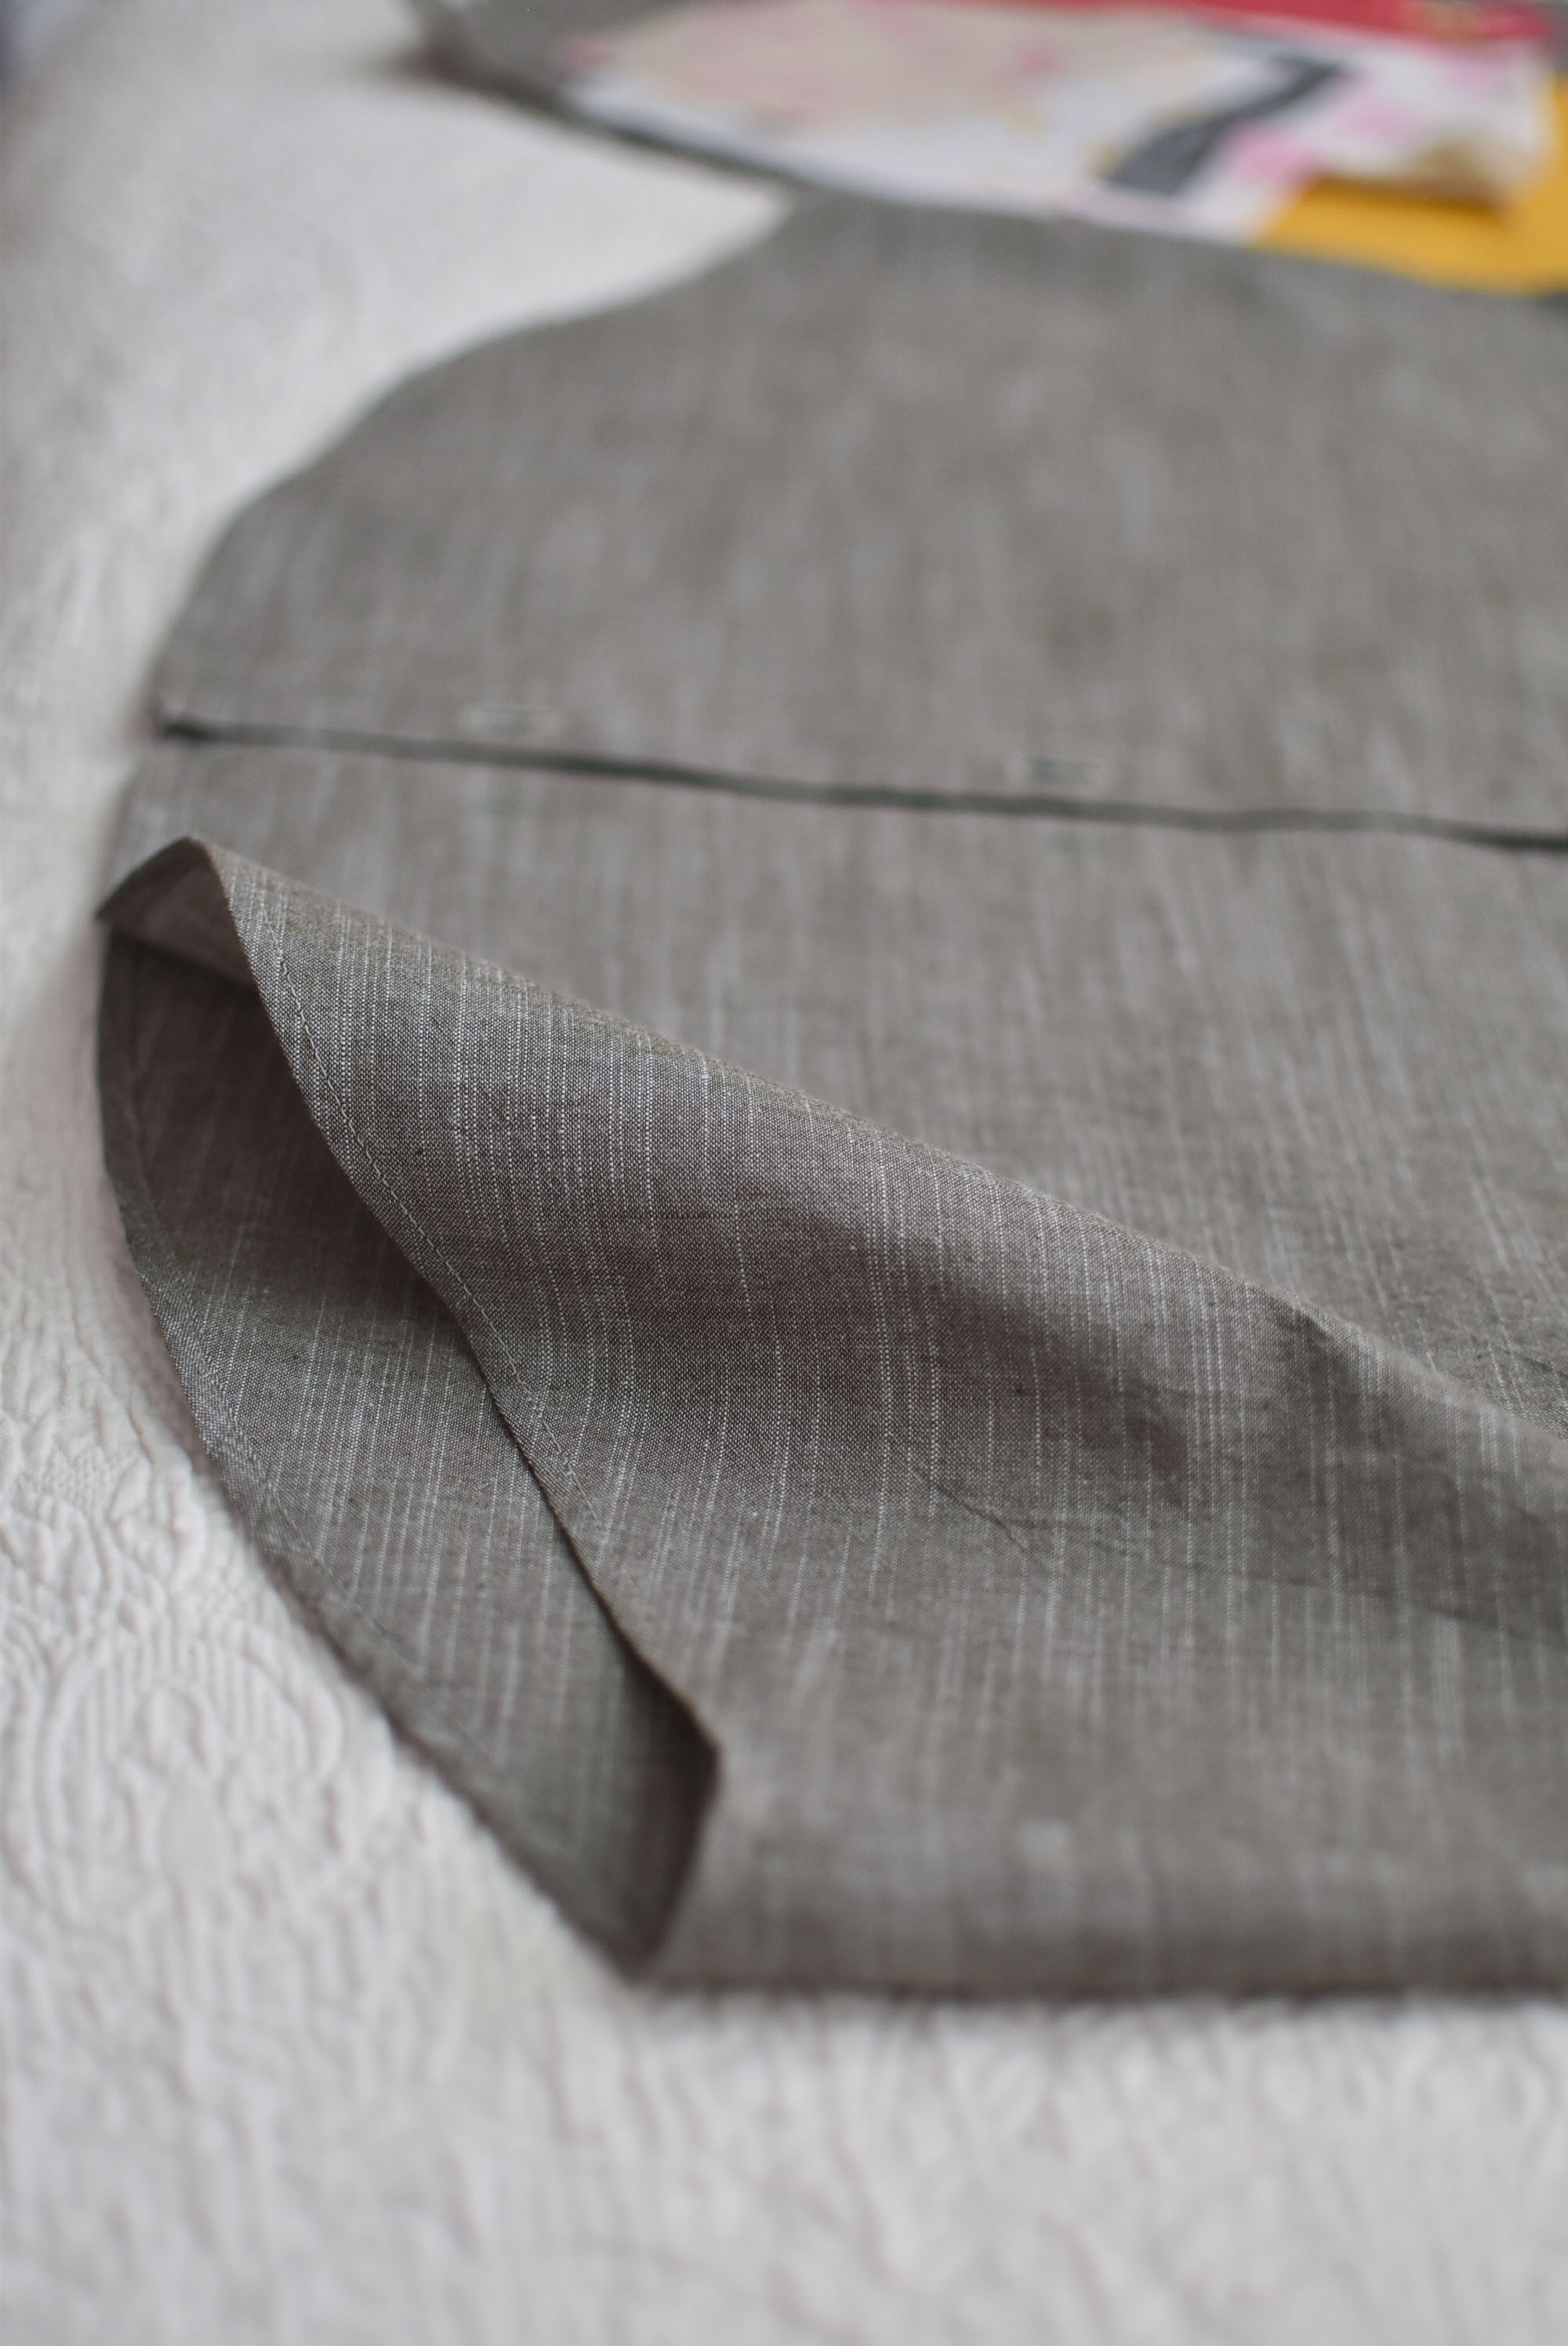
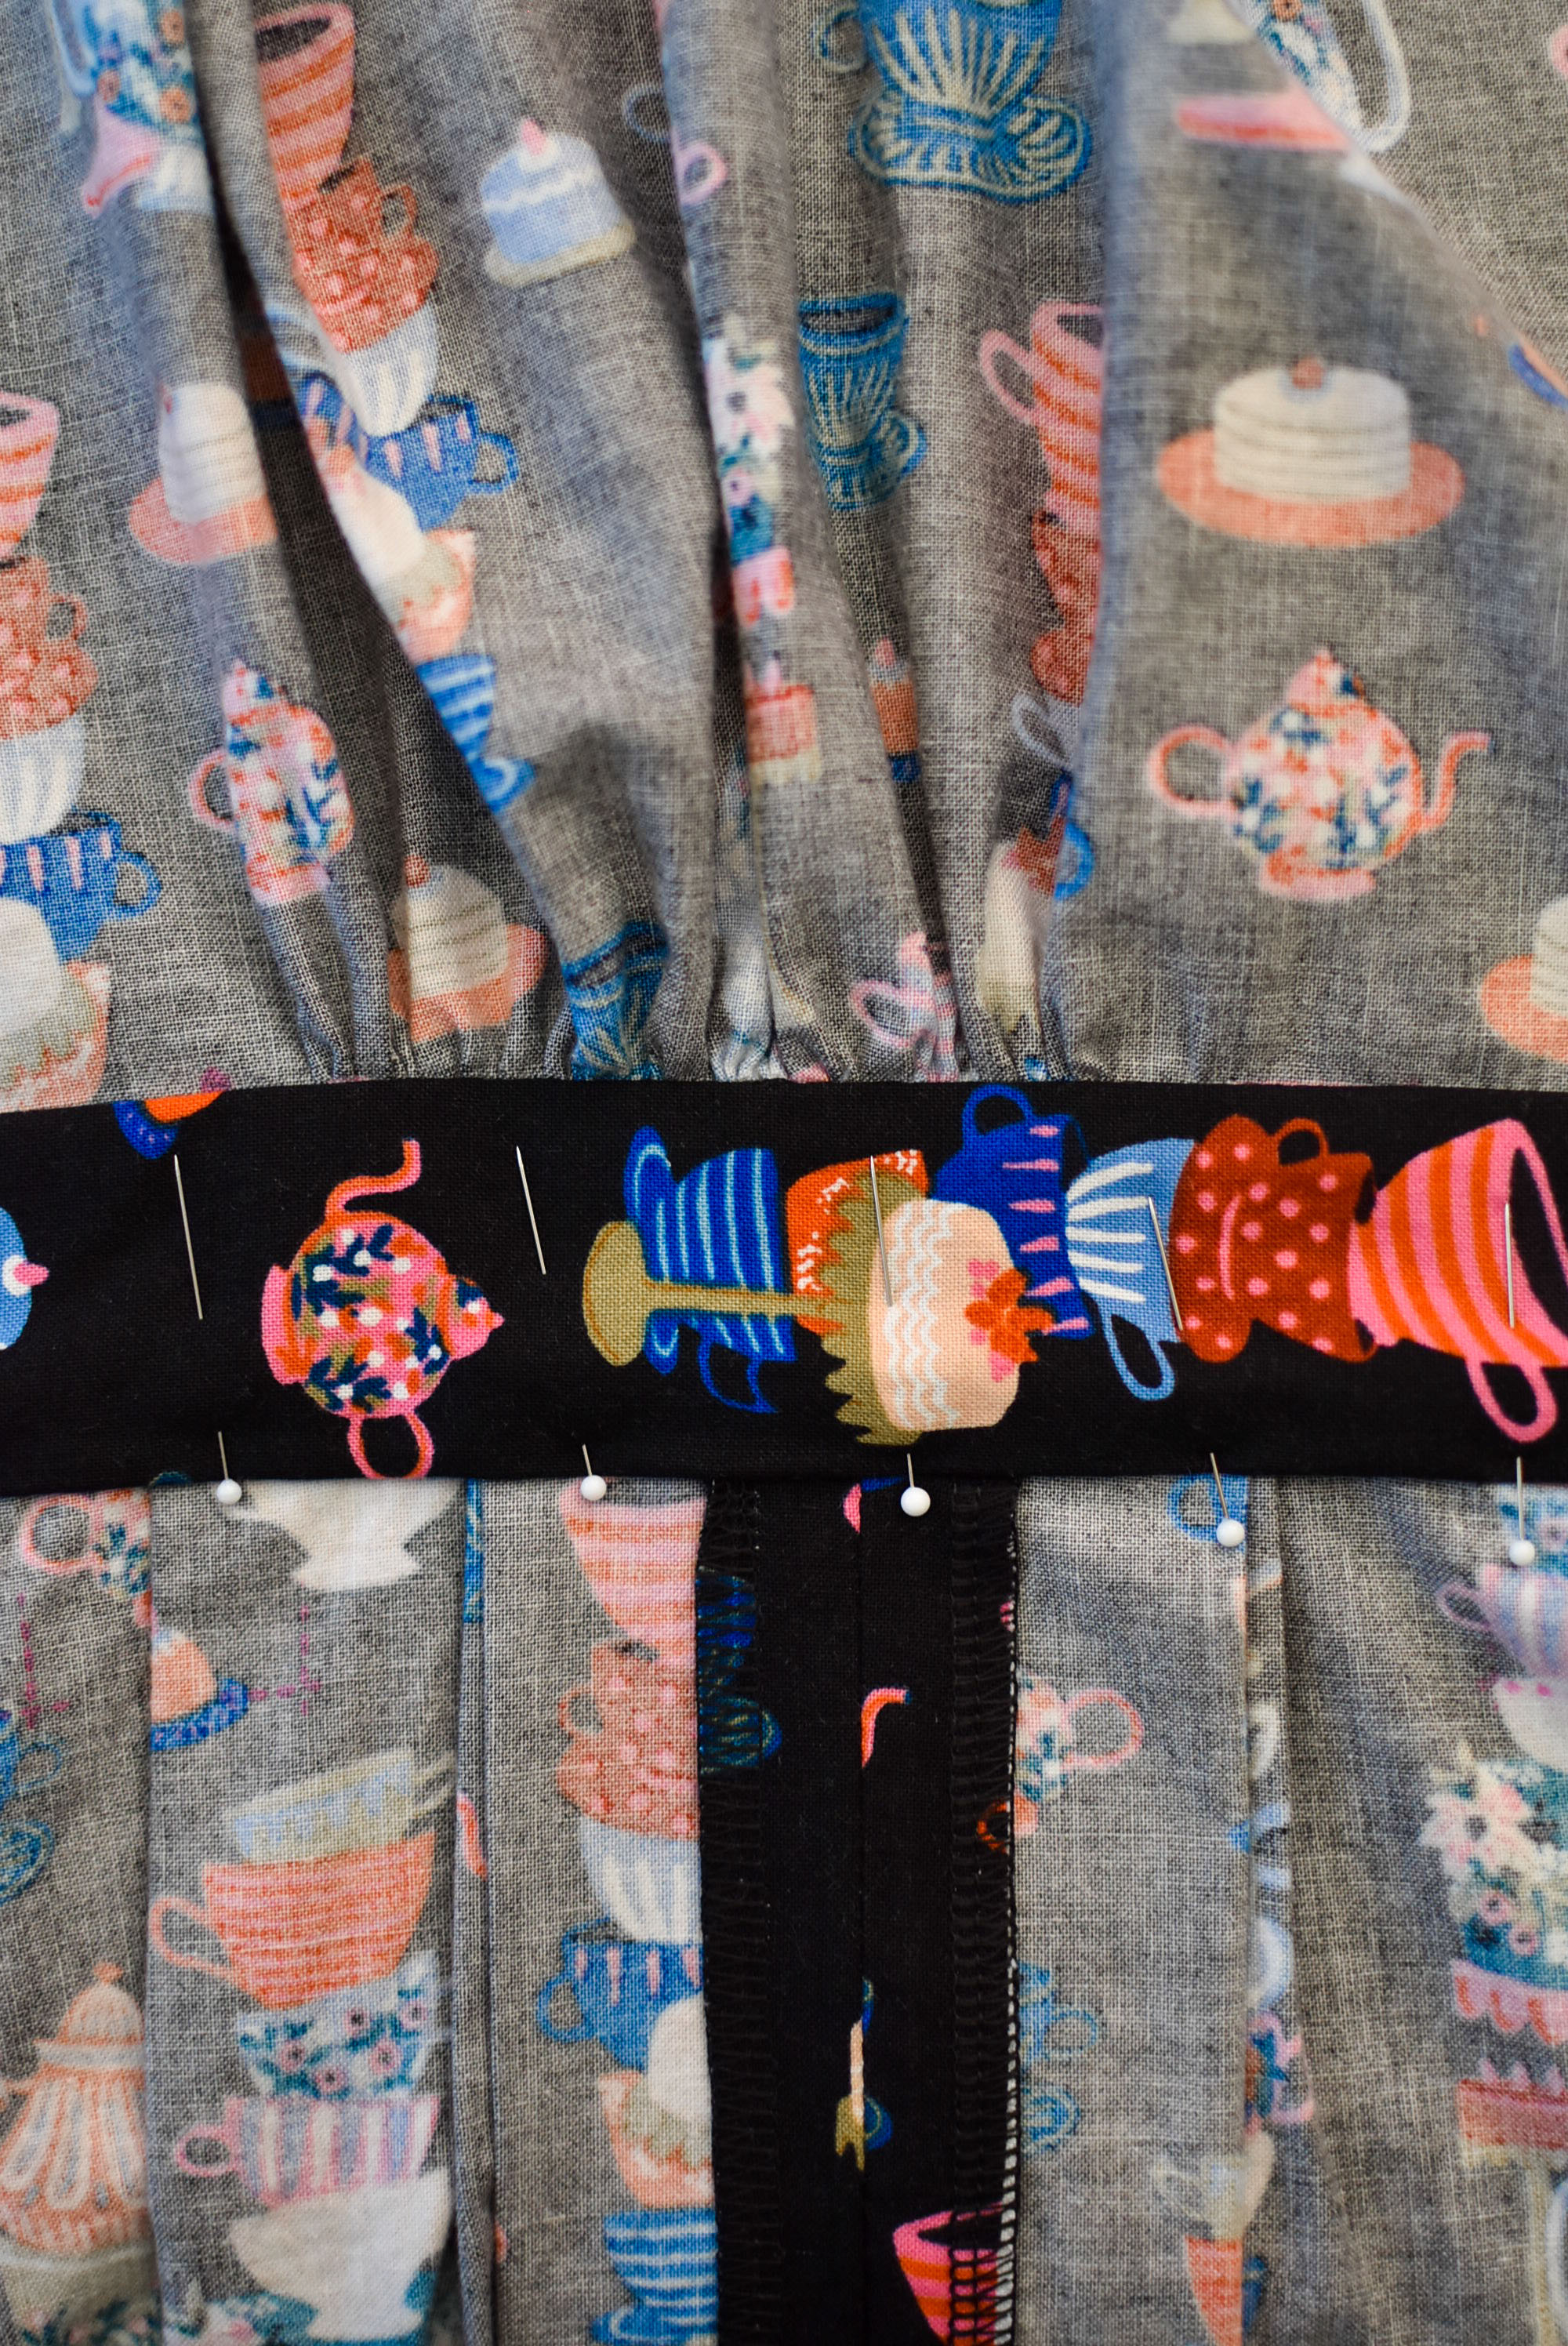
The main things I love most are the thumbholes, extra long sleeves, pleat detail and the bust darts.

  • Pattern: Käthes Schwester by Konfetti Patterns
  • Fabric: Raspberry Creek Oatmeal French Terry
  • Modifications: Moved the dart down. Took 1/4 inch off each side below the dart, shortened the longest sleeve option one inch. Size 50 made, I prefer my clothes a bit looser.
  • Lessons learned: Translating a pattern from German to English, different style of thumbholes, darts on knits!
  • Sew Again: YES! Absolutely! The pattern has quite a few different views, this is the extra long sleeve with thumbholes, middle cut length. It's long enough to wear over leggings which is awesome! I'd like to do the mini pleat version, regular sweatshirt length next. 
  • Pattern Difficulty: Easy peasy! The only thing that I did incorrectly was I didn't pull the pleated bit up high enough on the shoulder, I think I missed a set of notches in the pattern.

Next up for February is Pattydoo Nelly! I've gotten sucked into the world of European knit fabric and patterns. I think I can easily sew hoodies to wear until at least March, then it may get too warm here! :D


This post contains affiliate links to amazon.com. That means if you click the link and purchase something, I earn a tiny percentage of your purchase without any additional cost to you. All items I talk about are things I've purchased myself with my own money. :)

January 24, 2018 /Amanda Jennings
knits, sewing, german pattern, konfetti patterns, raspberry creek fabric, hoodie
Clothing, Creating, Year of Creating
Comment
hobonichicousin

New Hobonichi Cousin

January 03, 2018 by Amanda Jennings in Journaling

I'm really feeling the relief of a brand new year and a fresh start! 

winter-1-2.jpg
winter-1.jpg

My main goal is to spend as much time as possible outdoors and with my camera. In November I started walking each morning and I've really been enjoying it. I have coffee with friends at Starbucks almost every day and it's a nice way to get some fresh air AND exercise. These photos obviously aren't from my walks but they are my favorite winter colors. 

techooncousin-1.jpg
techooncousin-1-3.jpg
techooncousin-1-2.jpg

I finished my 2017 Hobonichi Techo pretty strong! I didn't miss a single day since August, when things got busy, I was away from home or felt stressful I made a note in my phone of what I might want to write about and when I had time, I went back and filled in the days. That approach worked really well for me. It became something I genuinely looked forward to working on each day! I'm using the monthly page to write a seasonal quote about the month and track the weather and moon cycles.

For 2018 I went with the larger Cousin because I wanted more space to include photographs, practice hand lettering and use lots of stamps + washi. I realized I can walk to Rite Aid and have photos printed really inexpensively on nice quality paper. I have a Canon Selphy printer but I don't love it. Walking for photos = fresh air and encourages me to get the photos off the camera! I  have a 64GB card with close to 15,000 photos from just 2017. I don't know why I don't share or do more with them so that's definitely a big goal!

I recently took advantage of the Makerist sale and picked up a few hoodie patterns. My goal is to eventually make this one. I'd like to sew a bit more but I'm just not sure what. I definitely find fabric shopping more fun sometimes than actually sewing. ;)

I did recently make Pattydoo's Lynn out of some hilarious Christmas fleece from Joann Fabrics and *loved it*. It's currently in the washing machine but I'm going to do a blog post about it soon. I lined the pockets and hood with some bamboo fabric and it is SO soft. A total snuggle fest. I'd like to make it again but I haven't quite figured out how to lengthen it and take in a sides a tiny bit. 

I hope you had a Happy New Year!

January 03, 2018 /Amanda Jennings
hobonichi, techo, cousin, winter, sewing
Journaling
1 Comment
hobonichitecho-1.jpg

Hobonichi Techo 2017

December 03, 2017 by Amanda Jennings in Journaling, Year of Creating
hobonichitecho-1-4.jpg
hobonichitecho-1-2.jpg
hobonichitecho-1-3.jpg
hobonichitecho-1-8.jpg
hobonichitecho-1-6.jpg
hobonichitecho-1-13.jpg

In August I began using my Hobonichi again. Life slowed down a bit and I didn't need the agenda/planner layout of the Happy Planner! I also wanted a bit more space to collage, stamp and write more. I like to work on it before bed or first thing in the morning with a hot cup of coffee. I got my first fountain pen, a Lamy Safari in Petrol, then Eric surprised me with a rose gold Lamy LX for our anniversary which I absolutely adore. 

I've really enjoyed journaling so much that I decided to go big in 2018 with the Hobonichi Cousin. I was so excited when it arrived, it feels more like a big squishy notebook! But I think I will miss the compact fat size of the techo a tiny bit. I am looking forward to having all the space, especially to practice my lettering! I've been really obsessing over some of the traveler's notebooks on Instagram and have pinned a lot of inspiration here. I love all the unique stamps, washi and ink options out there. I especially love the very full and layered pages of some journals!

I haven't had any time to sew lately but I picked up fabric to hopefully make a few gifts. And maybe a hoodie for myself! :)


December 03, 2017 /Amanda Jennings
hobonichi, techo, winter, journaling
Journaling, Year of Creating
4 Comments

Organic Chambray from Birch Fabrics

August 31, 2017 by Amanda Jennings in Year of Creating
birchorganicchambray-1-4.jpg
birchorganicchambraybonn-1-2.jpg

Fabricworm very kindly sent me some Birch Organics Yarn-Dyed Chambray to try!

What a dream this fabric was to work with! 

I've never sewn with chambray before, I wasn't sure what to expect. I was really, really, really pleased when I opened the package because the fabric is such a unique color and felt wonderful. This is Timber, it's a taupe-y gray that in some light has a brown undertone and in other light, a bit of a blue. The name suits it beautifully. I also like the subtle stripe-y ness of the fabric!

Screen Shot 2017-08-15 at 3.23.40 PM.png
lassen-5.JPG

I had to include these two photos! Left is in Yellowstone, right is in Lassen. See? Totally a gray/brown! Timberrrrrr! ;)

My initial plan was to sew Colette's Aster but I've been having a hard time getting their patterns to fit. I made two muslins and wasn't in love with them, although I'll come back to them at a later point.

I searched around a bit more and came upon Bonn by Itch to Stitch. I thought this shirt had nice clean lines and would be beautiful with this fabric. I made a muslin and it went really well! I recommend this pattern, especially to anyone who needs to adjust for cup size.

I washed the fabric first and was pleasantly surprised at how the fabric bloomed. After washing, the fabric is very soft and light, before washing it's very crisp. Don't confuse it with linen, it's tempting to see it and think about linen but it's not. It's a thinner fabric with a much softer hand and delicate drape. I love how lightweight and breathable it is, I wore this outfit (Bonn shirt + black distressed skinny jeans) while running errands in the low 100s degrees and it was fine! 

Sewing the chambray was easy peasy. It loves, loves, LOVES to be ironed. I shared a photo on Facebook of that hem because it's just beautiful! While it loves to be ironed, it still retains a bit of texture which is nice. I think people who love the aesthetic of peeps like Grainline Studio or Fringe Supply Co. could fall HARD for this fabric.

I'm very pleased with my final shirt and it's going to become a wardrobe staple! In hindsight I wish I'd made my muslin with my "normal" bra on and not my "I'm hanging around the house sewing" bra, my darts are a bit too high and long. Unfortunately, I didn't realize this until I was marking the buttons in the above photo. Eek!!! It's not going to stop me from wearing it because I love the way it fits, in reality no one is going to look at me and think "gosh, those darts could be lower", lol. I think this fabric works really well for warm weather, it's nice and breathable which is crucial for Northern California. And I'm also excited to wear it under cardigans this winter, because it's not bulky! :)

  • Pattern: Bonn Shirt by Itch To Stitch
  • Fabric: Birch Organic Fabrics Chambray in Timber
  • Buttons: Purchased at Heartstrings.
  • Modifications: None!
  • Lessons learned: Modified Mandarin Collar. I definitely did not nail it, but I can say that the chambray can handle 4+ times of being seam ripped with no fraying. ;) This was also my first set in sleeve, I pinned the heck out of the sleeves and they went smoothly.
  • Sew Again: YES! I'm going to do the DD version and I'm *really* tempted to get the color Shroom for it. 
  • Pattern Difficulty: Easy peasy! The only thing that I was stuck on was the collar, I couldn't for the life of me get it tidy!

A big thank you to Fabricworm and Birch for sending me this fabric to try! It was so fun to try a new fabric that I've never sewn with before!

*Fabric was provided for this blog post free of charge for this blog post. All opinions, patterns and other materials are my own. :)*


August 31, 2017 /Amanda Jennings
sewing, garment, bonn shirt, chambray, organic, clothes, notes
Year of Creating
2 Comments

Alder Shirtdress

August 24, 2017 by Amanda Jennings in Clothing, Year of Creating

I bought the Alder Shirtdress pattern when it was first released and then again as a Sprout! I realized some what belatedly that the Spout wouldn't work because I'd need to do an FBA so I'll most likely making it for a friend.

tiger-1-2.jpg
tiger-1.jpg

This pattern has haunted me since I bought it! All my friends have made it and all the photos I've seen of it are just DARLING! 

Now that I've learned FBA, collars, plackets, etc I thought it would be perfect time to give it a try!

  • Pattern: Alder Shirtdress by Grainline Studio
  • Fabric: Big Roar in White
  • Buttons: Purchased at Heartstrings.
  • Modifications: Graded up one size, FBA of 2 inches, added 1 inch to the skirt.
  • Lessons learned: I loved the sew-a-long and ended up using it instead of the pattern. I'll use her tips and tricks for perfect points on all my collars. 
  • Sew Again: This is tricky. I'll explain a bit below!
  • Pattern Difficulty: Easy! Very thorough! 

I worked hard getting the fit correct because I'm larger than the largest size on this but in the end I gave the finished dress to Ashleigh. The fit was so nice on me but I've never worn a dress in this style before and I just didn't feel comfortable in it. In hindsight, I should have tried on a RTW dress in a similar style. I kept the ease the same and the silhouette identical but I couldn't pull it off! Ashleigh however, looks awesome in it!

Since I did a ton of work getting the bust to fit beautifully, I will most likely make this again but as view A! And I have a RTW dress with chain loops on the sides and a self fabric tie, I *think* I'd do the same, just to pull in the waist a smidge. I don't want to give up on it completely because it did fit great!

This taught me a SUPER valuable lesson: even if the finished garment fits properly, you might still not feel comfortable in it! I think my previous mindset for sewing clothes was that if it fits properly, I'll automatically LOVE it on me but that's not quite true. I'm glad Ashleigh wears dresses often so in case this happens again, I can give it to a good home! ;)

August 24, 2017 /Amanda Jennings
Alder, Alder Shirtdress, Grainline Studio, Cotton & Steel, Big Roar
Clothing, Year of Creating
Comment

I made a swimsuit! Jalie 3350

August 18, 2017 by Amanda Jennings in Year of Creating, Clothing

This is a crazy post to make because I'm still kind of in awe by this.

I made a freaking swimsuit. And it fits. And I literally have had the best summer because I can go to the city pool, I can go to the lake, I can lay in the sun, I can do whatever I want and know I have a suit that makes me feel good!

I'd tried a few patterns by Jalie and had really good results. Their customer service is so good, any time I previously had a question, I always received a well thought out and helpful response. I thought "WHY NOT!" And bought pattern 3350. 

Next I needed fabric. I've been quilting for many years so online shopping isn't new to me ;) I found Imagine Gnats through instagram and saw she carried swim fabric and power mesh. It wasn't too terribly expensive, I figured this would be a muslin! It couldn't hurt to try. Her customer service was also great, I placed my order one evening and the next day she sent out a newsletter about swim suit sew-a-long with a promo code. I asked if it would be possible to use the promo code on my order and not only was she super nice about it, she sent over some wool jersey swatches we'd been chatting about on instagram! *High Five!*

19488669_10155557378005929_2372381517570216626_o.jpg
19667460_10155557379540929_6995155295906427285_o.jpg

I mentioned on the 29th of June on Facebook that I really wanted to do this and everyone was like "WHOA WHATTTT". And it turned out to be not hard at all! By July 1st I had a swim suit that FIT and the next day...POOL TIME!!!!!

  • Pattern: Jalie 3350 View B front, View A back
  • Fabric: Snakeskin from Imagine Gnats & Black Powermesh
  • Notions: Bra cups, lingerine strap slides and rings, swim hook all from WaWak.
  • Modifications: I am very large busted but have a narrow waist so I shortened the shoulder straps and tightened the under bust/upper back piece. This gave me plenty of support, even without underwire. I also added a few discrete stitches in the upper bust area because I was worried it was too much cleavage. I underlined the entire suit with power mesh.
  • Lessons learned: Trust the pattern and really focus on your measurements. I had so many moments of "this is not going to fit" but when I put it on and it fit perfectly, I almost cried. I was THRILLED. The front cross over part had me a little confused because I was overthinking it. I also accidentally crossed the opposite direction of the pattern. Design feature right. ;) I learned adding elastic to knits.
  • Sew Again: YES! My suit has held up beautifully. In a future version, I think I'd avoid underlining the whole suit, the outer fabric dries super quick, the lining not so much. I'd also skip using my coverstitch machine and just zig-zag stitch the entire suit. It would have been much faster if I wasn't switching between machines.
  • Pattern Difficulty: 2.5 out of 5. Jalie just gets to the point in their patterns and includes well illustrated diagrams.
  • Size Made: DD. My waist is 38/39 which was why I was able to tighten that upper back section for extra bust support, pattern is drafted for 40.

I'm not quite ready to share a full body bathing suit shot but I will share a selfie I took at the pool this summer that I used for an instagram story! 

Here's the thing about sewing a bathing suit: it gives you this feeling of AWESOMENESS. You don't have to feel that awful dressing from feeling and you can wear a suit that fits! I don't have a "beach body" (whatever that even means) but I enjoyed my time at the pool so much. I wasn't worried about wardrobe malfunctions or swimsuit drama. It stayed put, I swam around, I read books by the pool, I did laps, I cannon balled over unsuspecting kids. Yes, my body was the same, it's pudgy and lumpy but YOLO!!!!!!!!!!!!!!!!!! 

It gave me a ton of confidence and I'm so glad I did it!

August 18, 2017 /Amanda Jennings
body empowerment, swim suit, swim sewing, jalie, 3350, imagine gnats, swimsuit
Year of Creating, Clothing
2 Comments

Ashleigh's Birthday Dress: McCall's 6696

August 15, 2017 by Amanda Jennings in Year of Creating, Clothing

I took a bit of a crafting/blogging break unintentionally! I'd made this huge list of projects I wanted to try this year but I ended up trying something completely different- sewing garments!

simplicity-1-3.jpg

I've never really sewn clothes before or wanted to. But I was in a crafting rut in April, Me Made May was coming up and I thought "well, I can try this"! My personality is such that when I want to learn to do something, I want to REALLY learn it and immerse myself in it. So I researched, sewed, researched, sewed a bit more.

Ashleigh's birthday dress was my first "big" woven project. I'll say woven because I also sewed myself a bathing suit but that's knit and totally different. ;)

simplicity-1-6.jpg
simplicity-1-9.jpg

It was a PROCESS. Total process and I *loved* every second of it. 

First, a bit of backstory:

Ashleigh only wears dresses. She is the most ladylike lady you'll ever meet. She loves ModCloth and we stumbled upon a ModCloth dress one day out of Alexander Henry fabric. It got me thinking "what if eventually I could sew Ashleigh a surprise dress". Which turned into me deciding in July that I'd make her a dress. I'd only been sewing clothes since the end of May. And her birthday was July 28th.

The pattern was an easy choice- McCall's 6696 and the fabric was easy-ish too. Ashleigh loves Alice in Wonderland AND Rifle Paper so that was a win win. 

In order to make her the dress, I was like a sneaky spy! I asked if I could "borrow" one of her brand new dresses so I could "try it on so maybe I could get one as well", which is so goofy because I don't wear dresses! But I had a physical garment that I could lay the pattern pieces against to make sure it fit.

I then spent a week asking her the most RANDOM questions such as:

"Hey, I just cleaned out my closet and I found some brand new bras in a D cup...would they fit you?!" Because the pattern is based on cup sizes. Spoiler alert: I haven't worn or owned a D cup bra since probably 2009! ;)

"I was just telling Eric how tall your sister is, how tall is she again? How tall are you compared to her?" Because I needed to hem the dress and I didn't want it to be too short!


"Oh, I'm thinking about getting some Rifle Paper fabric, which one is your favorite print again". 

And so on. This was tricky because she is my best friend so I needed to be sneaky which I am absolutely not known for. I'm the type of person who will buy you a Christmas gift and then give it to you months before Christmas because I AM TOO EXCITED AND I CAN'T WAIT. So this was torture. And we work together all day. At one point I was so afraid that I wouldn't get it done that I had her on FaceTime with my computer angled up so she couldn't see what I was sewing while I was on the phone with her!

Thankfully, it all came together beautifully!

I scheduled out 4 hours a day for a total of 12 hours. It ended up taking me closer to 19, mostly because I learned I am a very, very, very slow sewer. 

Here are the details:

  • Pattern: McCall's 6696
  • Fabric: Rifle Paper Co. Mad Hatter in Black.
  • Buttons: Purchased at Heartstrings.
  • Modifications: I skipped all the hand sewing and used an edge stitch foot for very tidy results.
  • Lessons learned: First yoke, placket, buttonholes, collar/collar stand I've ever sewn.
  • Sew Again: YES! I'm not someone who wears dresses but I tried this on as I went just to make sure everything was straight and tidy and I liked it! I picked up Big Roar to use as a wearable muslin.
  • Pattern Difficulty: I had to google a few steps that weren't super clear to me, along with the height McCall's drafts for. Out of 5, I'd give it 3 stars, keeping in mind that this was my very first big project. :)

I'm excited to blog about some of my projects and get into the swing of sharing again. :)

August 15, 2017 /Amanda Jennings
McCall's, 6696, Rifle Paper, Wonderland, Dress, Garment, Sewing
Year of Creating, Clothing
2 Comments

CHA/Creativation 2017!

January 31, 2017 by Amanda Jennings in Creating, Journaling

Today I thought I'd share with you some photos from CHA and some products I'm looking forward to trying this year!

One of my main creative goals in 2017 is to do more paper crafting. It's a craft that doesn't aggravate my arm like knitting & sewing does and it's a craft that I've always wanted to explore more! Being able to attend CHA/Creativation was super inspiring! I couldn't wait to get back to the hotel at night and write stuff down.

Admittedly I wasn't able to get as much out of the show as I'd hoped. Pneumonia seriously kicked my butt, I was living on cough drops and caffeine which is never pleasant. Luckily most people I met were super understanding and friendly!

creativation-1-2.jpg
creativation-1.jpg
creativation-1-6.jpg
creativation-1-4.jpg
creativation-1-5.jpg
creativation-1-9.jpg

We went to Creativation to meet Nina of Waffle Flower Crafts! She had a beautiful sunshine-y booth that was so fresh looking! Ashleigh & I walked around all day on Saturday and met so many people!

It was really fun seeing so many demos and talking to designers. I was excited to see that American Crafts will be carrying customizable 1Canoe2 globes! I think they are so cute- especially the constellation one! 

I spent wayyyyy too much time at The Happy Planner booth! The gal we chatted with was such a sweetheart and they had *amazing* planners on display! I really loved being able to flip through them and see how other people use their happy planners. They had 2017/2018 planners on display and some had lavender rings. I want those rings SO BAD because it was such a pretty purple! I brought my planner with me and it was fun to show them how much I love it. #fangirl. ;)

Heidi Swapp had a really pretty booth with very friendly people. We did a demo of the Minc machine which as a magpie, I absolutely loved!  Essentially foil adheres to toner parts of your image after you run it through a cute little machine. It's really shiny and wonderful. 

Pinkfresh Studio was a really nice booth to visit, it felt very calm and sweet. They pick amazing artists to design for them. The first thing I did when I got back to the hotel was pick up this reading themed stamp. 

One thing I didn't get to try but I think I'm going to want so badly is the Tim Holtz Stamp Platform. I am AWFUL at precision stamping and I really loved watching him interact with people. He seemed really friendly and genuine. Also, tons of energy which I really love!

It was a really nice time and I'm glad we got to attend! :D


January 31, 2017 /Amanda Jennings
CHA, Creativation, the happy planner, The Frosted Pumpkin Stitchery
Creating, Journaling
1 Comment

The Happy Planner: Stuff I love, how I use it and more!

January 27, 2017 by Amanda Jennings in Journaling, Year of Creating
thehappyplanner-1-7.jpg
thehappyplanner-1-8.jpg
thehappyplanner-1-10.jpg
thehappyplanner-1-9.jpg

We have made it home from CHA/Creativation! Ashleigh & I had such a nice time! We met so many nice peeps and learned a ton about the craft industry. I only have a few photos from the show, both my camera & my phone were having some sort of meltdown which was super bad timing! But I do have a blog post planned with some of the neat products I tried and things I want to try in the future. I came down with pneumonia on Christmas and it has worn me out. I kept losing my voice which was embarrassing! I plan on catching up on a lot of sleep this weekend!

thehappyplanner-1-17.jpg
happyplanner-15.jpg

In November I went to Michael's and came across The Happy Planner. I saw them all over Instagram and thought they were pretty cute! But I was using a really nice Kikki.K for personal planning and a Rifle Paper planner for work planning. Michael's had a ton of cute planners, accessories, etc but I wasn't sure about the ring system. I'm notoriously hard on things and thought for sure I'd be losing pages! I ended up holding off until December when I scored a 60% off coupon + 20% off your total purchase. I picked up the Classic Minty Fresh because I really liked the dividers and the page colors. Since purchasing it, I've become totally obsessed! I thought I'd share it with you today along with some of my favorite supplies.

I use my Happy Planner as a combo of a personal daily planner + daily memory keeper. I use a lot of stickers, stamps, pens, scrapbook supplies and washi in my pages. It's a big mishmash of thoughts and journaling is something I really look forward to working on each day. I like to either spread everything out on my living room floor or just grab a few pens and curl up in my chair, writing away. It's cozy and a nice way to spend a little quiet time.

I totally admit that my personal life isn't all that exciting or busy and this is exactly what I struggled with when first using Hobonichi. It's easy to see journals and planners online and think your life doesn't quite compare. I've felt those thoughts. Trust me. But I've learned that for me, embracing the quiet makes me appreciate what I have so much more. I write about what books I'm reading, the weather, coffee with friends, shows Eric & I have watched, birds we've seen, outfit combos that I liked wearing along with practical things like grocery shopping, hair appointments, doctor's visits, etc. It's a collection of a lot of little moments that make up each day! Also: colorful! 

Some of my pages have a ton of stuff on them and some don't have much at all. Blank spots are fine and I don't mind if things run into each other or off the page. I don't stress about it! It seems against the rules to be unhappy while working in a happy planner. ;) The above page was from last weekend, I had so much to share that it's just all over the place! I tested out inks from different manufacturers, stamps and pens at CHA on this page, stamped the Saguaro National Park Passport and printed a photo of Ashleigh's first roadrunner sighting, and more! It's all over the place and I like that. 

The best part of The Happy Planner for me is how fast and easy it is to customize. I've made a bunch of covers by laminating pretty scrapbook paper, I've switched out the rings, I've made folders and dividers. I really like this aspect because I *adore* holiday things. I like that I can use a million Valentine's Day things and totally indulge in all the seasonal goodness!

I like to buy clip art from Creative Market for stickers and printables from Etsy. A few shops I've tried and have gotten really nice sets from are: ElysianPrintsCo, ilove2print and DesignLovelyStudio. I do have a Cricuit Explire Air 2 that I occasionally use for shaped stickers or cutting out folders (I use this cut file!) but mostly I print stickers and kiss cut them by hand with an exact-o knife. I find it relaxing in the evenings. 

I've also purchased some stickers from Etsy that have been super cute! I really love the quality of CleverGirlCraft's foiled stickers, Honeyinked clear stickers, Virgoandpaper kits and Paperandmilk!

In 2015 Ashleigh & I fell down the rabbit hole of stamps. We spent so much time sending flurries of texts back and forth with wish lists of stamps. There are SO many cute stamps out there! Obviously I'm going to mention Waffle Flower Crafts first because Ashleigh designed stamps for them and they are super cute! ;) I'm not the best stamper but on my pages they are the cross stitch cactus and unicorn! I bought an ink set from them last weekend and I've really enjoyed stamping with it! It comes in a cute box which I like, I don't have a ton of room left in my craft cart so I appreciate self contained things. ;) I also really like Pinkfresh, Mama Elephant, and Lawn Fawn! This moon phase stamp is super high on my wishlist right now along with this Bear and Bird stamp set!

And I love fine pens! On JetPens website you can search gel pens and then tip size. I prefer .38 if possible. I have very messy handwriting and fine tip pens make it so I can fit more of it in a small space. ;) One thing I've recently become obsessed with are pens that have tinted black inks! Like Bordeaux Black! It's black but also super deep and rich wine color. They are based in California and I usually get my order within a day or two. I've also had great experiences with The Goulet Pen Company. 

I found this cute little clear envelope at Staples! It's from the Martha Stewart discbound collection and I think it was around $4. I kept business cards and our business license in it last weekend and it was SUPER handy. 

I am forever forgetting to use promo codes and coupons. I made this little folder and tucked all the things that expire next month right with the February divider so if I decide to buy something, I have everything all in one place! 

And finally, a bit of happy mail. I've had my eye on this set of Field Notes for ages and finally bit the bullet! I have no idea what I'll write in them but sheesh, they are so beautiful! 

This post contains affiliate links to amazon.com. That means if you click the link and purchase something, I earn a tiny percentage of your purchase without any additional cost to you. All items I talk about are things I've purchased myself with my own money. :) 

January 27, 2017 /Amanda Jennings
journaling, the happy planner, The Frosted Pumpkin Stitchery, washi, pens
Journaling, Year of Creating
2 Comments

Reading, Baking & Stamps!

January 19, 2017 by Amanda Jennings in Home, Journaling, Creating
View fullsize happyplanner-15.jpg
View fullsize happyplanner-16.jpg

I totally got sucked into Seanan McGuire's Toby Dane series. I finished up the fifth book yesterday and instantly downloaded the next. Binge reading a series is one of my favorite things ever, especially if there are a lot of the books already released! The first one is currently $1.99 and I admit, I struggled with it. It has a lot of world building, slow moving, characters with similar names and fae hierarchy that was a little tricky for me to get into. Everyone said the series gets stronger and I agree! I'm now totally hooked. My favorite part is Spike, he's a creature called a Rose Goblin and I won't spoil what it is but if you are interested, the author has a cute illustration on her website. I sometimes struggle with books when the main character just goes through SO MUCH that you want them to just catch a break, I feel that way with this but the lighthearted bits keep me coming back! Also, there is a complicated relationship between two of the characters that I'm enjoying watching progress.

I've gone a really, really, really long time without baking! I think it's mostly because I have a love/hate relationship with my kitchen. It's very dark and has a small counter. But my stove is wonderful! So...love/hate. I made Nestle Toll House cookies today! I added chopped pecans and Guittard White Chocolate chips. I was thrilled that I had everything in the freezer to make them and they go together so fast. I'm in charge of snacks for a trip we are taking tomorrow. ;)

My husband, Ashleigh & I are heading to Arizona for the Creativation Show. Ashleigh designed a collection of super cute Frosted Pumpkin Stitchery stamps for Waffle Flower! We are super excited to work with them, it's really awesome to take something Ashleigh & I both love as a hobby (journaling, planners, etc!) and be able to create products for it with a special company. I've been playing around with the cactus stamps in my Happy Planner. I'm going to do a whole post on my planner because I *love* this thing a ton! I don't love the ink pads I have so I'm hoping to pick some new ones up while we are in Arizona or at least learn about different options!

If I can take some photos while we are there I'm sure I'll do a blog post about the show once I get home. :)


This post contains affiliate links to amazon.com. That means if you click the link and purchase something, I earn a tiny percentage of your purchase without any additional cost to you. All items I talk about are things I've purchased myself with my own money. :)  

January 19, 2017 /Amanda Jennings
reading, cooking, stamps, the happy planner, The Frosted Pumpkin Stitchery
Home, Journaling, Creating
2 Comments

January Project: mmmcrafts Swan a-Swimming

January 12, 2017 by Amanda Jennings in Creating, Year of Creating
mmmcrafts-3.jpg
mmmcrafts-4.jpg
mmmcrafts-6-2.jpg
mmmcrafts-8-2.jpg
mmmcrafts-15.jpg
mmmcrafts-17.jpg

Today I unpacked the supplies to make mmmcrafts Swan a-Swimming ornament! I purchased two bundles of wool blend felt from Benzie Design in November to make some of Larissa's swans. I picked the bundle for this pattern (#1) and Sweetheart Ombre! My order arrived super fast and it's been hanging out on my desk since then. I picked up really nice embroidery needles and Transfer Eze, I printed my pattern and pre-shrunk my fabric so I'm finally ready to go!

I'm not turning mine into an ornament, I have a bunch of bag charms on my purse and thought I'd use ribbon to make myself a swan charm! So far I've really enjoyed reading the PDF, it has a ton of great tips and tricks, I especially like the diagram that shows you where each color is used. I love when designers love creating patterns, this is one of those PDFs that you feel like you bought a special mini book and you know you will end up making multiples because the design and thought that went into creating it are wonderful.  

This is my January project. Each month I've set aside a WIP or brand new project that I hope to accomplish in 2017. It ranges from little things like patchwork zip pouches, to finish three (in various stages of competition) quilts, to embroidery, a garment and a few home projects. I don't have a ton of extra time and I can only do a limited amount physically can so writing it all down and assigning a full month to each project feels good and achievable! As you can see, January is a little project so I'd start the year off on a good foot. ;) I also picked projects that I genuinely want to work on with nice supplies that I'm looking forward to using which really helped me prioritize.

Hopefully tomorrow I'll be able to narrow down my color options, this is so tricky! Right now all the pieces of felt are drying in our laundry room and I keep walking by and rearranging them. Part of me wants to do something with lots of PINK (Valentine's Day is everywhere right now!) but another part of me loves those ice-y blues! I have a feeling once I decide the colors, this project will go together smoothly in the evenings while watching t.v. The pattern has step by step instructions and a guide to stitches which is nice because I haven't stitched in a long time! :)

This post contains affiliate links to amazon.com. That means if you click the link and purchase something, I earn a tiny percentage of your purchase without any additional cost to you. All items I talk about are things I've purchased myself with my own money. :)

January 12, 2017 /Amanda Jennings
goals, crafting, embroidery, January
Creating, Year of Creating
2 Comments

Tombow Irojiten & Hobonichi Techo

January 10, 2017 by Amanda Jennings in Journaling
coloredpencils-3.jpg
coloredpencils-4.jpg
coloredpencils-8.jpg
coloredpencils-9.jpg

It is a seriously gloomy day here! Our power has been flickering, it's pouring out and super windy. The perfect day to journal, read and nest! ;)

Yesterday I received some happy mail- Tombow Irojiten colored pencils in the Woodland set. Last night I swatched them in my hobonichi techo and today I'm playing around with them, I thought I'd share my initial thoughts! 

I want to try colored pencils more this year as opposed to brush pens, markers and ink because while I love my hobonichi, I really get frustrated with ghosting. Ghosting is when the image shows through onto the back side of the paper. It's not physically bleeding through the paper, it's just a hint of the previous image. Tomoe River paper is truly wonderful. It's smooth, feels so nice to draw and write on. But it's incredibly thin so ghosting can happen. 

I had a set of prismacolor pencils that I played with a tiny bit towards the end last year and I enjoyed them. My set was from college and has lived a full life, including many drops and sharpening issues so the lead isn't in the best shape. ;)

I was drawn to this set of colored pencils because the packaging is beautiful, the colors are really unique and the swatches from other artists looked interesting. 

coloredpencils-12.jpg
coloredpencils-15.jpg

You can see the ghosting from January 7th on January 8th- I had used some rain cloud stamps because: rain. I'm never quite sure what to do when ghosting happens. Do I cover the images? Do I just ignore them? Add washi? It's something so small, I don't know why it throws me off! :D 

I ended up tracing the clouds and filling them in with one of the pencils and swatching all the colors. The pale and light grayish tone sets are so, so, so subtle. I didn't really press down, I just started a little firm and gradually lightened the pressure to create a gradient. I'm not sure if the pencils aren't super pigmented, if I need to use more pressure or if i should layer them more!? 

I have a feeling I'm going to like using them but will have to build up layers. It'll be fun to experiment through out the year with these! I found this review which is really comprehensive about these pencils in case you'd also like to know about them. Mostly I'm looking to do some sketches and filling in stamped images. Previously I used Kuretake ZIG Clean Color brushes and they are SO GOOD. They do take forever to dry and sometimes I smudge things or over mix the colors. Also they can wrinkle the pages which doesn't bother me but towards the end of last year my hobonichi was so fat and hard to close!

The right hand side under the paper cut was done with the brush pens and it was really fun! I like watching people on youtube do galaxy paintings so it was my inspiration. 

In case you'd like to know my favorite comfort food from my entry and poor penmanship. ;) Cranberry Mustard Chicken Tenderloins! My mom made this when I was a kid, I found the recipe last night after thinking about it all the time lately! It turns out it's super fast and easy to make. My mods were tapioca starch instead of flour and I halved the butter/oil because I cooked the chicken in one batch. I like that the first comment says they've been making it since 1998! :D


This post contains affiliate links to amazon.com. That means if you click the link and purchase something, I earn a tiny percentage of your purchase without any additional cost to you. All items I talk about are things I've purchased myself with my own money. :)

January 10, 2017 /Amanda Jennings
hobonichi, techo, home, journaling, tombow, irojiten
Journaling
1 Comment
oranges-3.jpg
Blog Banner-3-2.jpg

Our Orange Tree

January 08, 2017 by Amanda Jennings in Home

Our home came with a giant navel orange tree in the front yard. The oranges are so sweet! The root stock is from the 40's, it produces around one million oranges per winter. Maybe not quite that many but it is a ton. ;) This week I had three different people knock and ask if they could have fruit. We give them away by the bucket full. Last winter I shipped dozens of boxes of oranges to friends, only to receive a letter in the mail...a notice of rejection! The CDFA detector dog, Dozer, sniffed out some oranges I mailed. I was supposed to label the boxes that they contained oranges from Butte County. The irony in this is that my husband is an Agricultural Biologist and inspects packages and shipments of plants and fruit as part of his job. I totally should have known better! :D

We are having quite the rainstorm currently, this morning a Black Phoebe sat under our covered patio on a string of lights to stay out of the rain. It was the cutest and saddest thing ever. Poor little dude!

January 08, 2017 /Amanda Jennings
birding, home, daily life
Home
Comment
Gray Lodge Dec Walk-55.jpg

Winter Gray Lodge Walk

January 06, 2017 by Amanda Jennings in Outdoors
Gray Lodge Dec Walk-63.jpg
Gray Lodge Dec Walk-86.jpg
Gray Lodge Dec Walk-92.jpg
Gray Lodge Dec Walk-72.jpg
Gray Lodge Dec Walk-97.jpg

In between rainy weather, we've had a few nice days to go for walks around Gray Lodge. This is my favorite time of year to visit! I love all the migrating waterfowl and how nice the light is. Lately we've been seeing the same ferocious little sharp shinned hawk along one of the walking trails, it's always fun to see if he is there! 

January 06, 2017 /Amanda Jennings
birding, gray lodge, gridley, dusk, winter
Outdoors
1 Comment

Powered by Squarespace